Frustrated with the slow performance of your system? Thinking about getting a new system but tight on budget? Do not worry; find out the root cause that is responsible for making your system unresponsive.
Windows has different ways in which anyone can easily check computer performance and know the root cause. You can easily resolve the issues and your system will work better.
There are multiple reasons like CPU, disk space, processor speed or your RAM Know which one is the culprit behind slowdown. If the issue is small, you can fix it yourself or take the help of any professional.
Follow any of the given ways and check the performance of your system.
Methods to Check Computer Performance
You know that something is wrong with your system but how will you get an exact idea of the problem? There are two different ways that will let you know the performance status of your system.
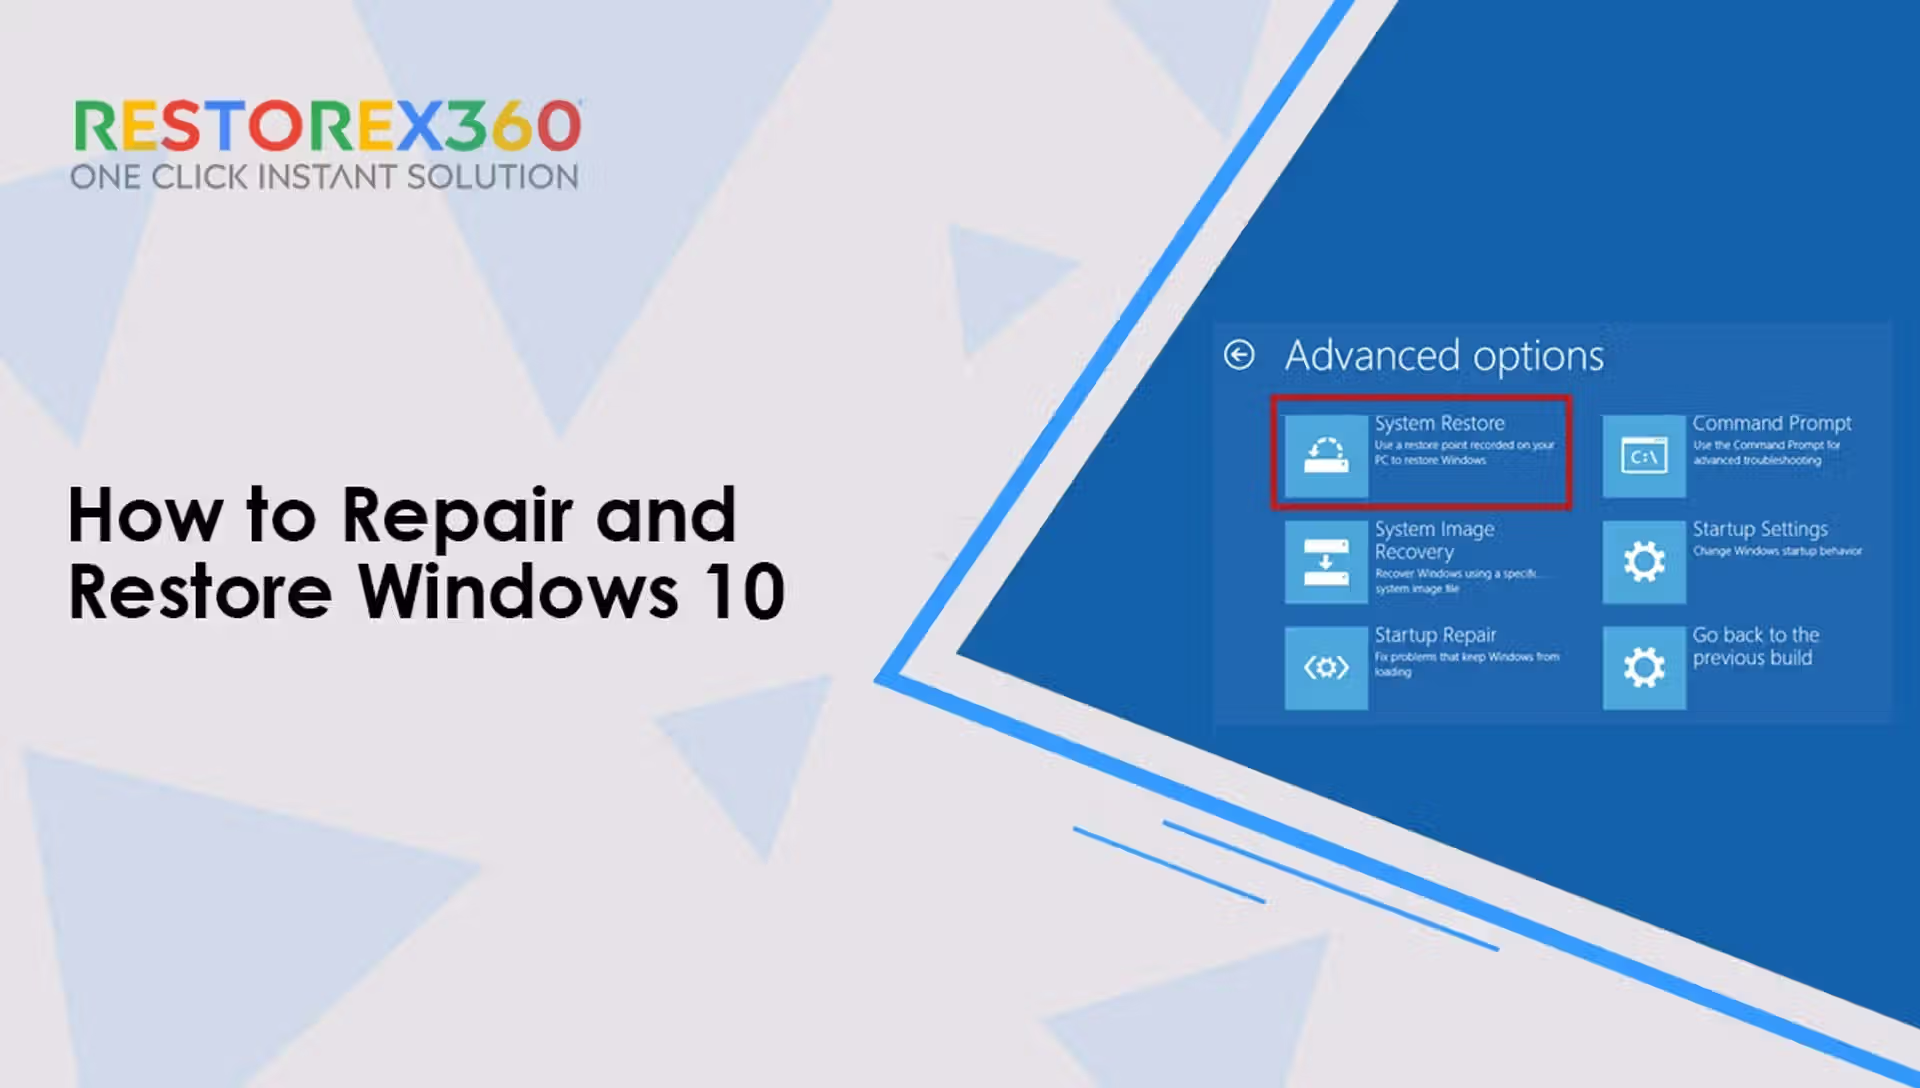
How will you Scan the System Through Windows security?
Windows has a security section for the safety of your system, you can easily scan and get the system performance report from here. It is very easy to get this report; just follow the given steps:
Open system’s Settings application by using Windows+ I together.
Now click on Update & Security.
Select Windows Security and then choose Open Windows Security option.
Here you will see the option Device Performance & Health. You will be able to get the performance report form here.
The most recent device health scan date is included in the health report. When you access the Device Performance and Health page, Windows Security tries to perform a device health scan; thus, the time displayed should be the current time.
Along with the time of the scan, you will also get the status of different key areas, which can be the major reason for your slow performance, such as:
How much disc space is available on your disc?
Ensure that your system time is always accurate by automatically synchronizing your system clock with an online time service. Device Performance & Health will alert you about Windows Time Service if there is a problem with this service so you can resolve it.
It will also inform you about whether software needs to be updated for better performance.
How will you Check System Performance Through the task bar.
One utility program that comes with the Windows operating system (OS) is Task Manager. Its main objective is to enable users to keep an eye on and control the programmes and processes that are operating on their computers.
But you can use it for computer performance checks. Follow the below steps:
To access Task Manager, press CTRL, Shift, and Esc.
Select the Performance tab. This page shows the RAM, CPU, GPU, disc, and network information for your system.
Click the Memory section to see RAMuse. This section will display the memory that the system is presently using, the RAM that you have available, and its specs.
By selecting the CPU area, you can view the amount of processor consumption on your machine. A changeable CPU utilization number, current clock speed, base clock speed, system uptime, and other information are displayed on the processor box.
To find out how much GPU RAM is being used, click the GPU section. If your PC has two GPUs, you may select which one to see (like with laptops with one integrated and one dedicated GPU).
Additionally, Task Manager offers a tidy summary view that shows just the boxes representing system resource utilisation. Within Task Manager, right-click and choose Summary View to go to that viewing mode. After that, as seen below, the Task Manager window will minimise.
Click the Processes tab to see which programmes use the most resources. This page shows the memory, CPU, disk, network, and GPU consumption of all open applications and background tasks. By choosing pointless third-party background programmes (or processes and services) you don’t need and pressing the End task button, you may also clear up system resources.
How will You Check System Performance Through the Resource monitor?
In Windows 11, the Resource Monitor is a little more comprehensive monitoring tool than Task Manager, which will help with computer performance checks. It debuted in Windows Vista and has since been included in all Windows releases after that. The resource monitor displays real-time information, including response time, throughput, and active time, in addition to CPU, network, disk, and memory utilisation.
Here’s how to use Resource Monitor to monitor system resource utilisation.
Click the Windows key to bring up the Start menu. Type Resource Monitor and click Enter.
The resource utilization graphs may be viewed by selecting the Memory tab. A physical memory graph, together with information on % utilisation, is included in that tab. It displays the amount of memory that is available, in use, and in standby.
To see the processor utilization percentage graphs, click the CPU tab.
To examine processes with network (internet) activity, select the Network tab.
To get information on memory, CPU, network, and disk usage in a single tab, click Overview.
How will you Check System Performance Through the Performance monitor?
The most advanced monitoring feature in Windows 11 is the Performance Monitor, which checks computer performance. It is intended to provide system summaries, performance reports, and real-time performance graphs in addition to aiding in the analysis of resource utilisation and system performance.
Here’s how to use Performance Monitor in Windows 11 to examine data about system resources and performance:
Type Performance Monitor into the Start menu by hitting the Windows key, then click Enter.
To examine the system summary resource utilisation data, select Performance from the menu on the left.
To see performance metrics in real time, click Performance Monitor. The graph displays the processor performance counter by default.
You can add more counters to the graph by using the + Add button.
Then select a counter, such as memory, on the window. The committed bytes line for the memory counter highlights the average RAM usage over time.
Click the “Add” button.
To see performance information for the counter you have chosen on the graph, click OK.
By building data collection sets, you may analyse this data more effectively. Choose the Data Collector settings in Performance Monitor to accomplish that. When you right-click on User Defined, choose New > Data Collector. The wizard that appears may then be used to configure the new data collector.
Reports provide information derived from data collection sets. In Performance Manager, select Reports to examine data from the data collection sets you’ve performed. Then select User Defined to view your data reports.
Restorex360’s Advanced Features:
- Restorex360 helps fix Windows boot errors, eliminating issues like boot loops and system crashes.
- Restorex Pro and Restorex Premium are ideal for users who need a comprehensive solution for Windows boot troubleshooting, Windows device monitoring, and PC repair software.
You can find out more about these solutions here:
- Restorex360 – Windows Boot Issues Fix
- Restorex Pro – 1 PC, 3 Years
- Restorex Premium – 1 PC, Lifetime
Optimizing System Security and Endpoint Management
For businesses or advanced users managing multiple devices, Windows endpoint management is essential for ensuring consistent security policies. Restorex360 offers a suite of endpoint security solutions to streamline device management and provide reliable security.
If you’re looking for remote management tools to handle remote desktop management, Restorex360 can help you keep all devices in your network secure and optimized. Tools like Restorex Endpoint are perfect for IT teams needing continuous access to devices for troubleshooting and repairs.
Explore these solutions for better network management software and IT support software:
- Restorex Endpoint – 1 User, Lifetime
- Restorex Lite – 1 PC, 1 Year
Other Tools for Windows Device Monitoring
If you’re managing a single device and want a comprehensive solution to monitor Windows devices or handle system performance, Restorex360 offers tools like Restorex Lite. This is ideal for users needing basic repair tools to maintain optimal performance without a complicated setup.
Learn more about PC repair software and Windows system restore tools that can help keep your device running smoothly:
Conclusion
By following the steps above, you should be able to remove your PIN from Windows 11 without any hassle. Whether you’re dealing with Windows boot troubleshooting or need advanced endpoint security solutions, Restorex360 offers tools to help you address Windows boot issues and startup problems quickly and efficiently.
For more information on PC repair software, remote PC repair tools, and Windows device monitoring, check out our comprehensive suite of products designed to keep your system running optimally.
Stay proactive with your system’s health, and use Restorex360 to tackle Windows boot error fixes, network management software, and more.
Internal Links Integration
- Windows Boot Issues – Restorex360
- Restorex Endpoint Solutions
- Restorex Pro – 1 PC, 3 Years
- Restorex Lite – 1 PC, 1 Year
- Restorex Premium – Lifetime Access
- Restorex Software Collection
Endpoint Solutions for Security
Note: You can also use any third-party app to check the system’s performance. These tools are either free or paid, depending on the scanning strength.
Frequently Asked Questions (FAQs)
Monitoring performance helps you detect issues like slowness, overheating, or resource overuse so you can optimize your system for better speed and stability.
You can check performance using built-in tools like:
Task Manager
Performance Monitor
Resource Monitor
Windows Security (Device Performance & Health)
Microsoft PC Manager (optional)
Press Ctrl + Shift + Esc
Click on the Performance tab
View real-time stats for CPU, Memory (RAM), Disk, GPU, and Network
Performance Monitor is a detailed tool that tracks hardware and software performance over time.
To open it:
Press Windows + R, type perfmon, and hit Enter
Open Task Manager > Performance Tab
Select CPU and Memory from the sidebar
It shows usage percentage, speed, and available memory
Resource Monitor offers more advanced, real-time performance details like:
Specific app usage
Disk activity
Network usage
Open it via Task Manager > Performance > Open Resource Monitor
Yes.
Go to Start > Settings > Privacy & security > Windows Security
Click Device performance & health to get a quick status report
Yes, some popular and reliable tools include:
HWMonitor (for temperature and hardware stats)
CrystalDiskMark (for SSD/HDD speed)
UserBenchmark (for full system performance test)
You can use tools like:
UserBenchmark
Cinebench
PCMark 10
These give you scores to compare your PC’s speed with others.
Check monthly or whenever your system feels slow, apps crash, or you upgrade hardware.